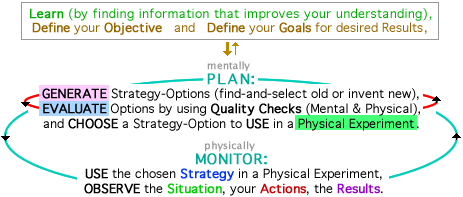
what ? When you explore the three diagrams in this page, you will “discover” the principles-for-process in my model for Design Process, i.e. for Problem-Solving Process by solving a problem when you make something better. { more about Design Process is in the HomePage of my website about Education for Problem Solving }
why? Using this page will make your process of learning easier than you would expect IF you began by seeing Diagram 3, so you justifiably were thinking “this is too much, it's too complex, and understanding it will be difficult, maybe impossible.” Why will it be easier? Because instead you will begin with the simpler Diagrams 1 & 2 so you will learn the model in easy-to-do steps. And because the problem-solving actions are logically organized. For these two reasons, your learning will be easier and better.
It will be easier to understand Diagram 3 after you
first see all three diagrams simultaneously, so you can get
a “big picture overview” that shows you how they all fit together.
Below is
most of Diagram 1 (its
bottom part has been removed)
and
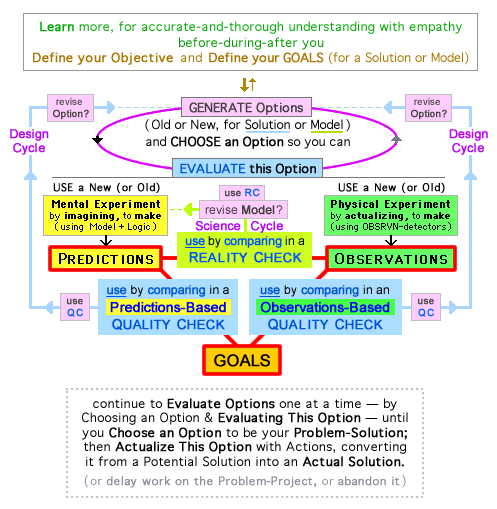
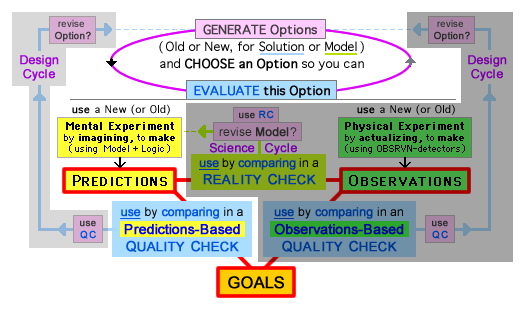
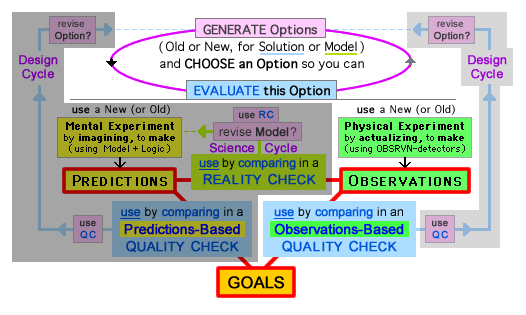
all of Diagram 2
and
most of Diagram 3 (the same
bottom part has been removed).
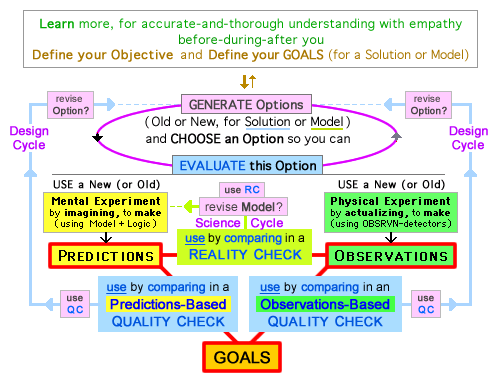
Where is Diagram 1 in Diagram 3 ?
Where is Diagram 2 in Diagram 3 ?
How do the “extra parts” of Diagram 3 (its left & right sides) answer
the Mystery Question? (by explaining why 1 has a right-side arrow)
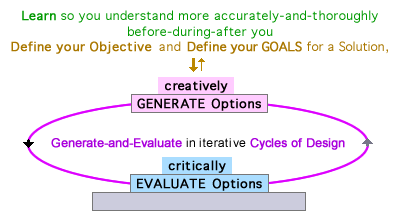
{ most of Diagram 2 is inside “the gray box” of Diagram 1 }
Diagram 3 - putting it all together:
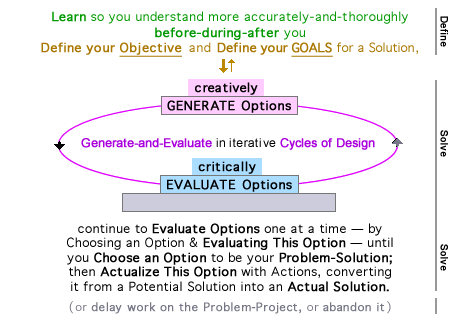
In Diagrams 1 & 3, the word "Cycle" shows that
you can choose the option of using an iterative Cycle
to let you improve an Option with Guided Generation when
critical Evaluation motivates-and-guides creative Generation
by revising the Old Option so it's a closer match with Goals.
{ using a Cycle is optional, as explained in Action-Sequences }
An essential relationship between the diagrams
is that 3 is basically a combination of 1-plus-2
or, in the language of mathematics, 1 + 2 = 3.
But it's only basically (not exactly) because
3 contains many new ideas. You can search
for them (and use hints for finding 22 new ideas)
in another page that lets you simultaneously see
the 3 full-diagrams, including "bottoms" of 1 & 3.
Action-Sequences in Design Process:
These occur because people intuitively USE Actions in a logical sequence. In the unshaded part of this version of Diagram 3 — showing its middle part (omitting top & bottom) with shading to form an “isolation diagram” that helps you focus on some of the Actions — you see a sequence that is common because when we finish one Action the logical “next step” is another Action that USES results from the previous Action.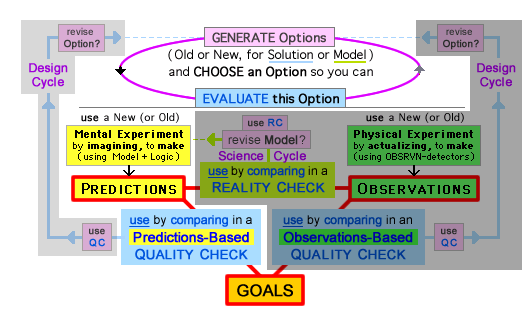
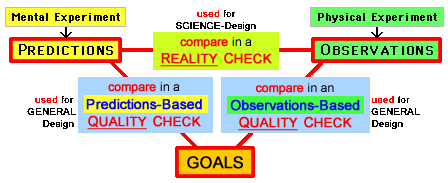
Why and How? You often do this sequence because a common way to "Evaluate this Option" is to “use, use” when you Use a Mental Experiment to make Predictions (about “what will happen”) that you use by comparing Predictions with GOALS (in a Predictions-Based Quality Check) to do an Evaluation. { As you know, a small diagram can be enlarged by right-clicking it and Opening in a New Tab (or a New Window that can be relocated and resized), or by “squeezing outward” on a touch screen or trackpad. }
Then — in the lightly-shaded area (showing that it's optional) — you can choose to use the Quality Check (in a Design Cycle) by asking "revise Option?" to decide if you want to Generate an improved New Option that has higher Quality because there is a closer match between its Actual Properties (in your Predictions) and the Desired Properties (that you're defining as GOALS for a satisfactory Solution). During this process of Guided Generation you are using critical Evaluation to motivate-and-guide your creative Generation. / In one of the diagram's many color-codings, the second "use" (in "use by comparing") is blue – because it's an Action that is done to EVALUATE – but the non-evaluative "Use" and "use" are black.
other options for Actions:
Instead of Evaluating An Option (as in the sequences above for use-use and use-use-use) you might choose to Generate Multiple Options (as in a creativity-stimulating strategy of Brainstorm-then-Edit) and delay Evaluations until later.
You can "Evaluate this Option" with a Mental Experiment and a Predictions-Based Quality Check. Or to "Evaluate this Option" you could decide to Use a Physical Experiment to make Observations that you use in an Observations-Based Quality Check that maybe – it's optional (as symbolized by the cycle's right-side arrow being gray) – you use to ask "revise Option?" in another kind of Design Cycle. And if you are “surprised” due to a failed Reality Check because Predictions are not matched by Observations, maybe (optional) you will decide to "revise Model" in a Science Cycle. These three options — Evaluate in a Predictions-Based Quality Check, Evaluate in an Observations-Based Quality Check, Evaluate in a Reality Check — are highlighted (in areas that are unshaded or lightly shaded) in three isolation diagrams:
the flexibility of Design Process: These options-for-actions illustrate how people can “use a problem-solving process that is similar for almost everything we do, but is not identical,” because our problem-solving actions are combined in many different ways by different people to solve different problems. When you coordinate your Problem-Solving Process by making Action-Decisions about “what to do next” your flexible improvising IS analogous to the flexible goal-directed improvising of a hockey skater, but IS NOT like the rigid choreography of a figure skater. { You can read a little more about our “similar but not identical” process, and much more with analogies about using roadmaps (for guided exploring) and music theory (for creative improvising of semi-harmonious melodies) or inventing variations (on a theme), choices of tools by a carpenter (or mechanic, electrician, plumber,...), using simple Lego bricks (to build complex structures) or using simple atoms (to build complex molecules & materials). }
What is Problem Solving?
what? With educationally-useful broad definitions, a problem is an opportunity to make things better in any area of life, and problem solving happens when we do make something better.
why? People solve problems because we want to make things better.
what? We begin a design project (it's a problem-solving project) by asking “what do we want to make better?” When making this decision, we Define an Objective by choosing to design (to invent or modify or find, or find-and-modify) a better product, activity, relationship, and/or strategy (in General Design) and/or (in Science-Design) a better explanatory theory. These objectives – extending far beyond traditional “design fields” – include almost everything we do in life. { iou – during July 25-27, I'll link to a section that describes the wide variety of objectives for design projects. }
why? The main reason that it's basically "everything we do" is because we design-and-use a strategy MANY TIMES every day in many ways, most often by asking-and-deciding “what should I do?” or (with details) “what is the best use of my time now? and later?” The wide variety of Problem-Solving Objectives (and thus Problem-Solving Activities) is one of the...
two wide scopes: Design Process has a wide scope for Problem-Solving Activities because problem solving includes almost everything we do. It also has a wide scope for Problem-Solving Process because people use a problem-solving process that is similar (but is not identical) for almost everything we do. You will recognize the similarity-in-process when you compare The Actions of Design Process (in Diagrams 1-3) with Your Actions (while you solve problems) and you think “These Problem-Solving Actions are My Problem-Solving Actions” so your Discovery Learning becomes Recognition Learning. This recognition will happen for most people, because Design Process accurately describes the practical problem-solving process that is intuitively used by most people, for almost everything we do.
more: These two wide scopes are educationally useful because they allow a wide variety of problem-solving activities in the classroom, and they promote transfers of learning that help us build bridges from school into life for motivating students to pursue their own personal education.
Experiments produce Experiences
Choosing to broadly define Problem & Problem Solving is educationally useful, and so are two other broad definitions. I define education as learning from life-experiences. And in the context of Design Process, an Experiment is any situation that produces Experiences, and provides an opportunity to generate Experimental Information when you make Predictions (by imagining in a Mental Experiment) or you make Observations (during the actualizing in a Physical Experiment); i.e., any Prediction-Situation is a Mental Experiment, and any Observation-Situation is a Physical Experiment. Therefore, instead of seeing "Experiment" (in Diagrams 2 & 3) and thinking “I don't do experiments,” you can recognize that many of your daily Experiences do involve Mental Experimenting or Physical Experimenting. { more about Experiments-and-Experiences }
learning Design Process
will be easier than you expect:
Initially you could justifiably think “Diagram 3 is complex and will be difficult to understand,” but learning will be easier-and-better than you think because...
you will learn the model in easy-to-do steps: Learning is easier because you begin by understanding the simpler Diagrams 1 & 2, then seeing how these “logically fit together” to form Diagram 3.
the problem-solving process is logically organized: Learning is better because, reinforcing our intuitive common sense, scientific research shows the benefits of organizing knowledge. / The apparent “initial complexity” of Design Process becomes actual “eventual simplicity” when students understand how the actions combine to form a logically organized problem-solving process. And when they recognize their own problem-solving process in Design Process. Both of these factors – organization and familiarity – help their model-understanding and their model-using become psychologically intuitive for them.
two questions will help you
answer the Mystery Question:
What? In the 1st Diagram ("Define and Solve"), why does The Cycle have arrows on both sides? It's easy to understand its left-side arrow (from Generate to Evaluate) because you must Generate An Option before you can Evaluate This Option, and you should Evaluate any Option before you actualize it with Actions. But there is...
• a mystery question: Why does the cycle have a right-side arrow, from Evaluate to Generate? Think about this, and then ask...
• a related question: The right side-side arrow points from Evaluate to Generate. Therefore, ask “after I critically EVALUATE an Old Option, how can this help me creatively GENERATE a New Option?” And continue by asking...
• a similar question: While you're exploring the 2nd Diagram ("Evaluate An Option"), ask yourself “after I Compare Predictions with Goals in a Quality Check and decide that the quality-of-matching isn't fully satisfactory, what is a useful next action?”
All of these are basically the same question. You can answer it with your own thinking, then confirm what you have discovered in the 3rd Diagram that is followed by my brief explanation.
a strategy for instruction: A teacher can use these three questions to “guide the discoveries” of their students, to produce an optimal level of challenge that lets them have more fun and get more satisfaction during their process of learning-by-discovering.
my favorite verbal-and-visual representation...
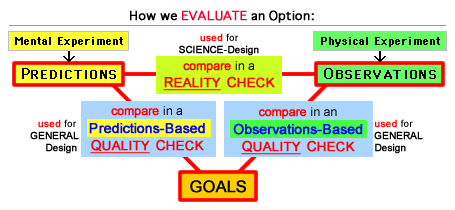 is the 2nd Diagram (to "Evaluate An Option") due to its combination of art-and-logic, with spatial relationships & elegant symmetries in the 3 Comparisons of 3 Elements (using Predictions-Observations-Goals in two Quality Checks and a Reality Check), with color-codings for the Elements (yellow, green, gold) and Comparisons (yellow-green, blue), plus blue & black text. This diagram is my favorite – 🙂 – and I hope you also will like it, will appreciate its logical beauty and what can be learned from it. / More generally, I'm fascinated by (and have creatively designed) a wide variety of verbal-and-visual representations.
The logical integrating of Design-with-Science in the diagram can help students understand how they can improve the logical integrating of Design-with-Science in their thinking when they internalize this logic with experience in problem solving, when they practice using the diagram's comparative Evaluations for General Design (aka Design) and for Science-Design (aka Science) by using comparative Quality Checks and comparative Reality Checks to ask The Design Question and The Science Question. { more about logical integrations in The Comparisons and The Questions }
Cycles of Design Process and
Cycles of Self-Regulated Learning
In the classroom, a valuable way to use Design Process (DP) is to help students understand-and-use a metacognitive strategy of Self-Regulated Learning (SRL). This is due to the similarities between SRL and DP (basically a Cycle of SRL is a Cycle of DP), and because scientific research has shown that SRL is educationally effective for helping students improve their academic skills and social-emotional skills. For these reasons, an important application of DP is to teach SRL by using DP, to teach SRL with DP. This diagram — that is modified for teaching SRL, so it's DP-for-SRL — is carefully examined in the HomePage. But consistent with the goals of this page, here I'll just ask questions to guide your exploring so you can Learn by Discovery:
 meanings & purposes for colors: What is the meaning of the color-codings for blue and green? i.e. What is the “mode of action” for all blue actions, and for all green actions? and what is the purpose of the blue actions, and the green actions? / Also think about “what and why” for the other colors, for the red, brown, and purple, for example when you "Observe the Situation, your Actions, the Results."
experiments and cycles: Why are there multiple Mental Experiments in the Mini-Cycle (to Generate-and-Evaluate), but only a single Physical Experiment in the Overall Cycle?
sequences of actions: Earlier you saw Action-Sequences that occur in different parts of Diagram 3. In this diagram for SRL, what Action-Sequences (in what parts of Diagram 3) are used in the Mini-Cycle and in the Overall Cycle? These sequences use Quality Checks, but you might also use a Reality Check if you “are surprised” while you are doing SRL-with-DP.
The HomePage has more about SRL with my responses to these questions, plus why-and-how we can improve our education by using Self-Regulated Learning and Design Process.
iou – during July 25-31, I'll finish developing “the extras” in this section, by briefly describing and linking-to sections where you can learn about...
strategies a teacher can use to help their students learn by discovery; plus improving their understanding-and-using of Design Process with digital flashcards and other evidence-based principles for effective learning.
what and why? my overall model for Design Process is a family of individual models (e.g. with Diagrams 1,2,3, plus the “isolation diagram” and DP-for-SRL diagram. why? I'll describe the benefits-for-instruction of having “a family of models” in Design Process; e.g. in another page you can see 19 diagrams (the 5 in this page plus 14 others), including a Clicker Map but I think the only one that will be commonly used in classrooms is the SRL-for-DP that is designed for teaching SRL-with-DP.